Docs
Everything You Need to Know
Widgets
Select List
When you need to provide the user the ability to pick one of several options, use ChocolateChip-UI's select list. Internally this is a radio button group, but visually it looks like a list of selectable items. Only one item can be selected at a time. If you need multi-select, use ChocolateChip-UI's Multi-Select List.
A select list has the following structure:
<ul class="list" id="selectList">
  <li data-select="${ data.type}">
    <h3>Lorem</h3>
  </li>
  <li data-select="${ data.type}">
    <h3>Ipsum</h3>
  </li>
</ul>
To turn a simple list into a select list, you need to define it with the following options: an element, a selected list item and a callback. If no selected item is provided, none of them will be selected at load time.
var mySelectList = $.SelectList({
  element: '#selectList',
  selected: 2,
  callback: function() {
    renderSelection();
  }
});
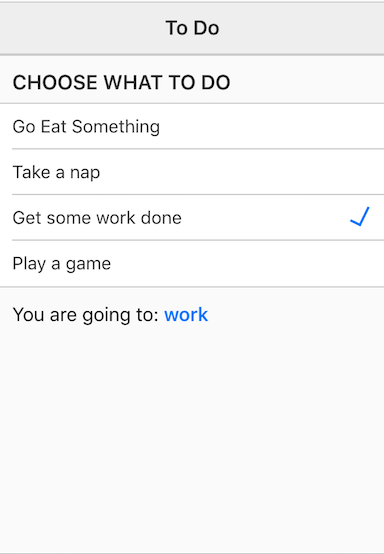
You can also provide a name option to use with the select list: name: 'myChoice'. If you do not, defaults will be used. You would want to provide a name if you intend to get a JSON object from you form elements. Read about form validation to learn more. You can find out what the current selection of a list is by querying the instance of the list that you created. Please note that upto version 4.1.2 you would use getSelection(), but since 4.1.3 the preferred way is to use val():
mySelectList.val()
This will return an object like this:
{index: 2, value: "work"}
To get just the value, you could do this:
// Get the value of the selection:
mySelectList.val().value

// Get the index of the selection:
mySelectList.val().index
Please check out the file "selectlist.html" in the examples folder. Read the following instructions for getting the examples.
Select List Example
See the Pen Select List by Robert Biggs (@rbiggs) on CodePen.
Selecti List with Android Theme
See the Pen Select List for Android by Robert Biggs (@rbiggs) on CodePen.