Docs
Everything You Need to Know
Widgets
Navigation
Navigation lists enable you to provide a way for the user to drill down from the general to the specific. Navigation lists are very easy to implement, and providing a back button in the navigation bar of the target ui-screen automatically allows the user to return to the previous ui-screen. No coding required.
Importing UINavigation Into Your Project
In order to implement navigation, you need to import UINavigation into your project. That means you have to have a project created with the chui command line tool. To learn how to create a project, read the documentation. After creating a project, open your project and go the the dev folder. Inside it you will find your project's main JavaScript file: app.js. At the top of that you need to import the UINavigation widget:
import {UINavigation} from './src/widgets/ui-navigation'
After importing UINavigation, you are ready to implement navigation.
It's best to keep the contents of navigation lists simple. Each list should have an attribute that tells ChocolateChip-UI where it will navigate to. This is done with the data-goto attribute. Its value should be the id of the ui-screen to go to. You don't need to include the '#'.
For example, if you wanted a fruit list item to go to the "oranges" ui-screen, you could do this:
<li  data-goto='oranges'>
  <h3>Oranges<h3>
</li>
As long as there is a ui-screen with that id, tapping that list item would take the user to that ui-screen. You do not need to write any code for this. As soon as the app loads, ChocolateChip-UI looks for data-goto attributes and registers an event to handle the navigation, complete with animation.
Now that we have a list item navigating to oranges, we want to give the user a way to get back to the fruit list. We can do this by adding a back button in the navigation bar of the oranges ui-screen. This is literally just a button with a class of "back":
<nav>
  <button  class="back">Fruits<button>
  <h1>Oranges<h1>
</nav>
That's all there is to it. ChocolateChip-UI will see the back button at load time. When the user taps it, ChocolateChip-UI will use its internal navigation system to figure out which ui-screen the user came from and send the user back to it, complete with animation.
For more information about this type of simple navigation, please take a look at the file navigation.html in the examples folder of the source code form Github.
Routing
By default, when the user taps a navigation list item, ChocolateChip-UI dispatches that navigation id to its router. Using ChocolateChip-UI's router you can do some interesting things. For example, if you wanted to set up a navigation list where the items all went to the same destination and you wanted to render the contents of that destination based on which item the user tapped, you would use routing.
Importing Router Into Your Project
In order to use routing, you'll need to import the Router class into your project. You do that by by including the following at the top of your app.js file in your project's dev folder:
import {Router} from './src/widgets/ui-router'
After importing Router, you are ready to use it to set up routes.
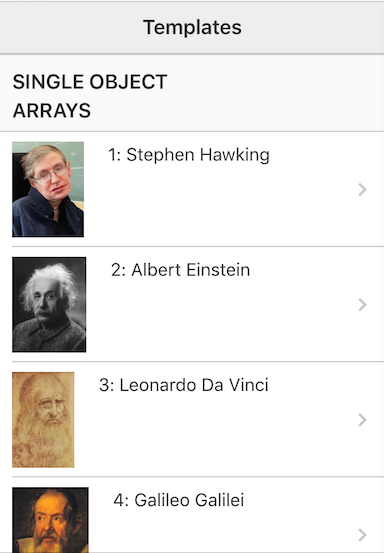
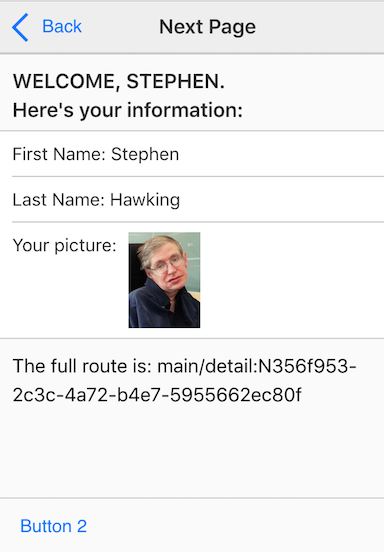
To understand how to set up our navigation list, let's take another look at our fruit list. This could be build from a complex object of fruits. We build the list using just the fruit names. When the user taps a name, the user will be land on a detail ui-screen where they can see everything in that fruit's object. For this to work, we need a unique identifier for each fruit object.
Route Paramters
We can pass parameters to the router by adding them to the data-goto attribute value. We indicate a parameter by using a colon:
<ul>
  <li data-goto='detailScreen:apples'>
  <h4>Apples</h4>
  </li>
  <li data-goto='detailScreen:oranges'>
  <h4>Oranges</h4>
  </li>
  <li data-goto='detailScreen:bananas'>
  <h4>Bananas</h4>
  </li>
</ul>
Now that the route parameters are implemented, we can capture them in a route. To do so, first we create a route object using the new Router() class. Then we define the route we want to catch. We do this with the method .addRoute(). This takes an array of route objects. Each route object has two properties: a route, and a callback to execute when the route is navigated to.
// Create route object:
const FruitRouter = new Router();
// Add route to router:
FruitRouter.addRoute([
  {
    route: 'detailScreen',
    callback: (id) => {
    //  id will be the fruit id
    // of the list item the user tapped
    // Filter the fruit from a collection:
    const chosenFruit = fruits.filter((fruit) => fruit.name === id)
    // Render view with user choice:
    chosenFruitView.render(chosenFruit);
   }
 }
])
The above route makes a few assumptions. First, that we have a fruit collection call fruits with objects that have a name property equal to our fruits. Secondly, that our detail ui-screen has a view named "chosenFruitView" that we can pass our fruit object to for rendering. If this is new to you, go over to views to learn how to create views. For more information about routing, please read about ChocolateChip-UI's Router.
Examples
Check out the following examples in the source code to see how to implement navigation lists
- navigation-backto.html - shows how to go back to an arbitrary place in the navigation history
- navigation-routes.html - navigation with routes
Read the following instructions for getting the examples.
Basic Navigation List
This navigation list uses a separate ui-screen for each navigation destination.
See the Pen Navigation List V5 by Robert Biggs (@rbiggs) on CodePen.
Navigation List with Routing
Here's the same list redone using routing. There is only one destination ui-screen for this list. It uses routing to populate the destination with the correct data.
See the Pen Navigation List with Routing V5 by Robert Biggs (@rbiggs) on CodePen.
Navigation List with Android Theme
See the Pen Navigation List with Routing for Android V5 by Robert Biggs (@rbiggs) on CodePen.